PropInspect
Move-In Inspection: A Room-by-Room Guide
A move-in inspection is a dated, room-by-room record of a rental's condition, made just before the tenant takes possession. It is the baseline every move-out deduction is measured against, so anything it leaves out is hard to charge for later.
Start a free inspection Create a free account
When to do the move-in inspection
Do it after the unit has been cleaned and any make-ready repairs are finished, and before the tenant brings in a single box. Once furniture is in place you can't see the carpet under the sofa or the wall behind the dresser, and a scratch found later could have happened on moving day.
The best time is the day the keys change hands, with both of you there. If that isn't possible, inspect as close to the handover as you can and say in the report when it was done. A record made two weeks before move-in leaves room to argue that something changed in between.
Some states set their own clock. Virginia, for example, gives the landlord five days after occupancy to deliver a written move-in damage report, and Massachusetts has a ten-day window for its Statement of Condition. If your state has a rule like this, the inspection has to fit inside it.
Who should be there
Walk it together if you can. The tenant notices things you've stopped seeing, like the sliding door that sticks or the stain you painted over last year that is bleeding through, and anything you both looked at on the day is hard to dispute later.
If the tenant can't make it, do the inspection yourself and send the report the same day with a short note asking them to tell you within a few days about anything you missed. Add what they report as a dated addition rather than quietly editing the original.
If you manage the property for an owner, the person who inspects at move-in should ideally be the one who inspects at move-out. If that can't be guaranteed, write notes that someone else could follow without asking you.
What to bring
- A charged phone with plenty of free storage, and a battery pack for a larger house
- A flashlight for under sinks, inside closets, and the water heater cupboard
- A plug-in outlet tester, which costs a few dollars at a hardware store, so you can check every outlet instead of guessing
- The keys, fobs, remotes, and garage openers you're handing over, so you can count them in the record
- A list of rooms in the order you'll walk them, so the move-out inspection can follow the same route
Make sure the utilities are on. You can't test the stove, the heating, or the hot water in a unit with the gas or power off, and an untested appliance is an argument waiting to happen.
What to check, room by room
Work in the same order every time: start at the front door, move clockwise through each room, and look at the ceiling, then the walls, then the floor, then the fixtures. A fixed pattern is what stops you skipping the closet you always skip.
Entry, living, and dining areas
Check the front door, deadbolt, peephole, and weatherstripping. Look at walls and ceilings for nail holes, patches, and water stains, and at flooring for scratches, pet damage, gaps between boards, and carpet stains. Open and lock every window, check the screens and blinds, try each light switch, test each outlet, and press the test button on every smoke and carbon monoxide alarm.
Kitchen
Turn on every burner and the oven. Open the fridge and freezer and check they are cold. Run the dishwasher's rinse cycle and the garbage disposal, and use the flashlight under the sink to look for drips, swollen cabinet floors, or old water stains. Photograph counter chips, burn marks, and the inside of the oven, because "the oven was already dirty" is one of the most common move-out arguments.
Bathrooms
Flush each toilet and watch it refill, run hot water at every tap, and check the caulk around the tub and the grout for mold or gaps. Turn on the exhaust fan and press on the floor around the toilet base for soft spots. Record cracked tiles and chipped tubs even if they are old; if they aren't in the move-in record, they look new at move-out.
Bedrooms and closets
Check that closet doors run on their tracks, shelves and rods are secure, and windows lock. Look at the carpet in corners and doorways, where wear shows first. Bedrooms are where small nail holes and tape marks pile up, so photograph the walls even when they look fine.
Systems, safety, and outside
Run the heating and air conditioning, note the thermostat setting and the filter's condition, and look at the water heater for its age sticker and any rust at the base. Photograph each utility meter so the readings are on record. Outside, look at the yard, fences, visible gutters, the garage door, the parking space, and any storage unit that comes with the lease.
How to photograph the move-in condition
Photos win deposit disputes when someone who has never seen the unit can tell what they show. A few habits make the difference:
- Take a wide shot of each wall from the opposite corner first, then close-ups of anything worth noting. The wide shot shows where the close-up is.
- Shoot straight on, in good light. Open the blinds and switch on every light; use the flash only inside dark cabinets.
- Put something next to small damage for scale: a coin, a key, or a tape measure laid across a scratch.
- Photograph what's fine, not only what's wrong. A clean carpet in the move-in photos is the evidence that a stain at move-out is new.
- Record a short video sweep of each room. Video is harder to argue with than a single angle, and it catches things you didn't think to photograph.
- Don't filter or edit the images. An edited photo invites the question of what else was changed.
A two-bedroom apartment can easily need more than 100 photos. That isn't overkill; it's the difference between a record and a few snapshots.
Write notes that will still make sense in a year
"Carpet: fair" tells nobody anything at move-out. A useful note says what, where, and how big: "Bedroom 2 carpet: 4-inch bleach spot, 2 feet inside the door on the left." Keep each note next to the photo it describes.
Use the same few condition words throughout, such as new, good, worn, and damaged, and use them consistently. If something is old but works, say so. The age of a carpet or a coat of paint matters later, when you work out what normal wear looks like.
Keep the record separate from the to-do list. Some findings are just information (a faded countertop), some need fixing before or soon after the tenant moves in (a dripping tap), and some are existing damage the tenant must not be charged for (a cracked tile). Label each one so nobody later mistakes a known issue for a new one.
Common move-in inspection mistakes
- Inspecting after the tenant has started moving in, when furniture hides floors and walls
- Photographing only damage, so there's no proof that everything else was in good shape
- Writing "good condition" for a whole room instead of describing each surface
- Skipping the inside of appliances, cabinets, and closets
- Not testing anything: a stove that looks fine but has a dead burner becomes a move-out argument
- Keeping the report on one phone and never sending the tenant a copy
- Using different room names or a different route at move-out, which makes comparison slow
State-specific deposit guidance
Deposit rules are set by each state: how much you can collect, how fast it must be returned, and whether a written move-in checklist is required at all. Washington, for example, requires a signed move-in checklist before any deposit can be collected. Our security deposit laws by state guides summarize every state's rules with citations, so read the one for your rental before the inspection.
Doing the move-in inspection with PropInspect
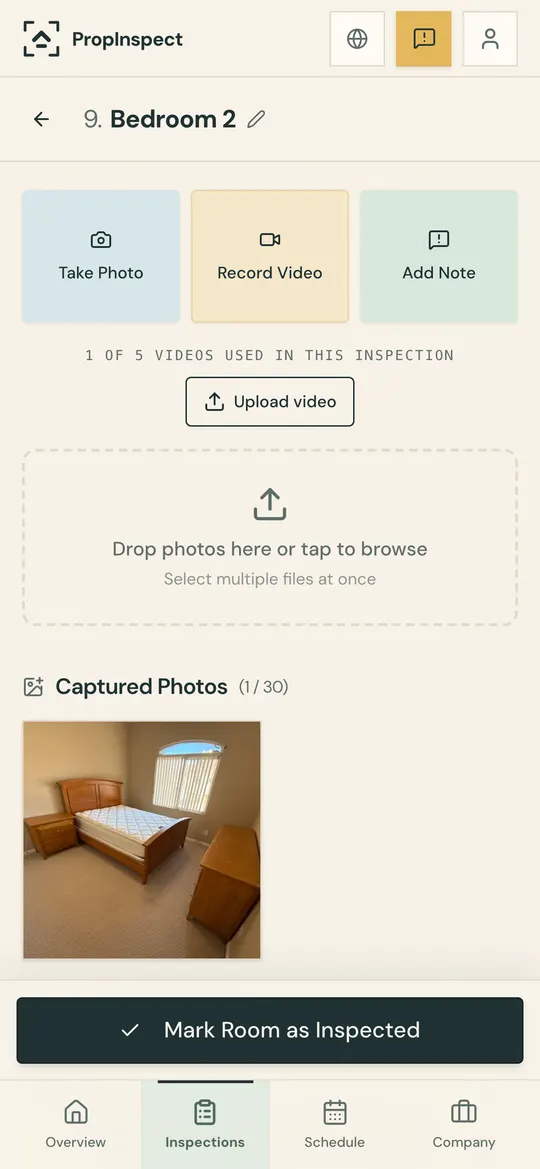
PropInspect is a browser app built for this walkthrough. Type the address and the rooms are set up for you. In each room you take photos, record clips of up to 60 seconds, and add notes tagged Info, Fix, or Damage, which match the three kinds of finding above. If the signal drops in a basement or a new building, capture keeps working and you sync with one tap.
When you finish, every room, photo, and note is in one report. Send the tenant a read-only link they can open without an account, or a PDF.
Frequently asked questions
What is a move-in inspection?
A move-in inspection is a documented walkthrough of a rental property's condition right before a tenant takes possession. It records the baseline state of every room with photos, notes, and sometimes video so both landlord and tenant agree on the property's condition.
Who should be present at a move-in inspection?
Ideally both the landlord (or property manager) and the new tenant. Doing it together lets the tenant confirm the documented condition on the spot, which makes the report far harder to dispute later. If the tenant can't be there in person, PropInspect also lets you send the finished report as a read-only link.
How long does a move-in inspection take?
For a one- or two-bedroom apartment, plan on 45 minutes to an hour if you test the appliances and photograph every wall. A larger house can take two hours. Rushing is the most common reason something is missing from the record.
Does the tenant have to sign the move-in report?
It depends on the state. Some states, such as Washington, require a checklist signed by both parties before a deposit can be collected, and many landlords ask for signatures everywhere as good practice. PropInspect doesn't collect signatures; it shares a read-only report. If your state or lease requires a signature, get it separately, for example on a printed copy of the PDF.
Is PropInspect free for move-in inspections?
Your first inspection is free, with no account and no credit card. After that, each inspection is $0.99, with no subscription.
Walk the unit. The report's already done.
Photos, video and notes land in the right room as you go. Share one link before you're back at the office: the repair person sees what to fix, the tenant sees why, the owner sees everything.
- Done at the door, not at your desk
- One link for everyone. No account, no app.
- Dated, room-by-room proof for when the deposit is due
First inspection free, then $0.99. No subscription.